OBD
The supporting factor of this entire installation is a series of M4L plugins that allow the user to track and analyse different colored blobs. The positional data of these blobs can be sent out over MIDI cc and used to control different parameters in your Ableton project, or can be used to generate MIDI notes.
Currently, these plug-ins are still in a primitive form and can only be applied in a limited number of situations; they are capable of detecting and tracking light or color differences. The aim is to further expand these plug-ins and add filters that give the user the option to base their object tracking on factors such as frame difference. With some adjustments, these plug-ins could be fully capable of recognizing, tracking, and outputting data from any moving object in any video source.
Check this website and my github page regularly for updates!
If you have any questions surrounding the plug-ins, you can always contact me on tiesvdp@gmail.com.
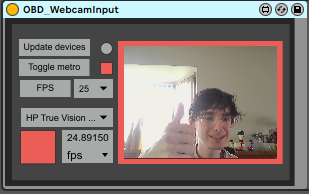
OBD_WebcamInput
WebcamInput is the flagship of the OBD series. This plug-in allows the user to input a live webcam signal into M4L and send it to OBD_Mothership. The interface is simple and includes the following components:
- Update devices: refresh the list of inputs.
- Toggle metro: this button starts the metronome to output the image with a stable FPS.
- FPS selector: select the FPS of the incoming source here.
- Device selector: use this dropdown to choose the correct device you want to use as a webcam.
- Main out: this button toggles the video output on and off.
OBD_VideoInput
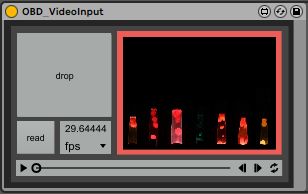
VideoInput works similarly to WebcamInput but takes in video files instead of a webcam signal.
- Drop: Drag a video file into this area to load the video.
- Read: Opens the computer's file manager to select a video file.
- Controls: Options to pause, fast forward, rewind, and toggle the loop function on or off.
OBD_Mothership
Mothership is the central hub of all OBD plug-ins. This plug-in allows the user to individually edit the incoming video signal up to 8 times. For each individual channel, the user can precisely configure how the image tracking should be done using the 8 filter buttons and monitor options. The values resulting from this tracking can then be sent to the subsequent OBD plug-ins. Additionally, Mothership has several useful options to save CPU resources or to output the tracked image to a separate screen for recording with external software.

- Scaling options: Use the zoom button to zoom in on the respective axis. Use the offset button to shift the center point of the image.
- Channelselect: Select which channel you want to monitor on the left screen.
- Monitorselect: Select how you want to display the channel on the screen. You can choose between full (full image + tracking), received (incoming image), brco (image after brightness and contrast filtering), luma (binary image after color filtering), binary (image after coverage filtering), and tracked (layout of the blobs).
- Save preset: Save the scaling and filtering for the current selected channel.
- Channelselect: Indicate here for which channel you want to enable or disable tracking. By turning off unused channels, you can save a lot of system load.
-
Filters: With these buttons, adjust the current preset.
The order is as follows:
- Bright + Contr: Adjust brightness and contrast.
- A-R-G-Bscale: the parameters for the jit.rgb2luma filter (see 'from lava lamp to MIDI'). A is white light, R is red, G is green, B is blue. So, if you want to track a red object, keep all faders down and slowly open the red filter knob until you see the object coming through the filter.
- OpTresh: Set the coverage threshold. All pixels with an intensity lower than this threshold will not be sent through the binary filter.
- LaTresh: Set the area threshold. All blobs with an area below this threshold will be filtered out of the image.
- Master clock speed: Sets the speed of the master clock. Lower the speed if tracking becomes too heavy for your CPU.
- Value monitors: Here you see the values that the tracking sends out for the selected channel.
- Videoselect: Select from which channel the video is sent to the external screen.
- Video toggle: Toggle the transmission to the external screen on/off.
- Bright: Brightness of the external screen.
- Delay: Use this fader to delay the video signal on the external screen. This is especially useful if you use a large buffer size and want the video to be synchronized with the audio in your Ableton project.
OBD_Generator
Generator allows the user to generate notes based on the tracking data from a specific channel. There are many modulation options available to make the generated notes sound 'human' or even play melodies.
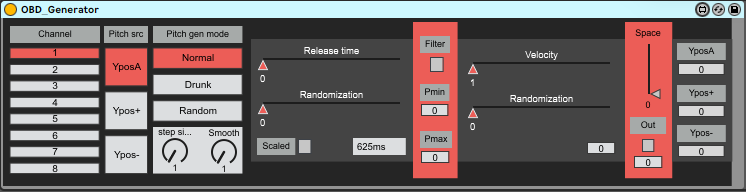
- Channel: select which channel you want to receive data from.
- Pitch src: select which value you want to use to generate notes.
- Pitch gen mode: choose how you want to generate the pitch. 'Normal' takes the absolute value of the incoming number (value between 1-127). 'Random' generates a random value between 1 and 127 with each new incoming value. 'Drunk' is a controlled version of random generation where you can set the interval size between the generated notes using button #4.
- Step size: set the interval size. Only applicable when 'Drunk' is selected as the generation mode.
- Smooth: smoothens the generated pitch based on the interval of the previous 2 values. Use this button to avoid large pitch interval jumps.
- Release time + randomization: set the release of the generated note. (In MIDI terms: the time between the NoteOn and NoteOff message). This value exponentially ranges from 1 to 20000ms. 'Randomization' adds randomization to the release time. This value exponentially ranges from 1 to 20000ms unless button #7 is on.
- Scaled: an alternative way to add randomization to the release time. When this button is on, the randomization is determined proportionally depending on the release time. If you have a release time of 60ms and fully open randomization, values from 1 to 120ms will be generated. If the randomization is halfway open, the release time varies from 31 to 90ms.
- Pmax + Pmin: set the minimum and maximum pitch for generation.
- Filter: this button filters out notes with the same pitch from the generation.
- Velocity + randomization: determine the velocity of the generated notes. This works similarly to release time and randomization but does not have a scaling function.
- Space: set the time between generating notes. This value exponentially ranges from 1 to 40000ms.
- Out: Toggle the output of the generated notes on/off.
OBD_MiniMidi
This plug-in allows the user to receive data from a channel on individual tracks in Ableton and send it out over MIDI cc. I strongly recommend using this plug-in in combination with 'Max Api CtrMIDIcc' to link these cc values to plug-in parameters in your Ableton project. This external plug-in, included in the core library of Ableton Live Suite 12, also enables you to modulate and refine the output of this MIDI cc data.
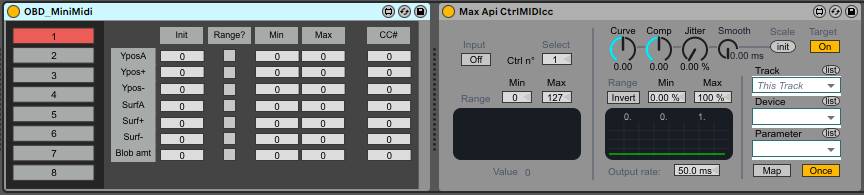
- Channelselect: select which channel you want to receive data from.
- Init: the initial value that comes in.
- Range?: turn this button on if you want to turn the incoming signal into an ON/OFF signal. You can do this by setting a range with buttons #4.
- Min/Max: set the minimum and maximum value of the range. If the parameter value falls within this range, the plug-in sends out a maximum value of 127. If the value falls outside this range, the plug-in sends out a value of 0. This way, you can integrate 'toggles' into your project to dynamically turn other plug-ins on or off, for example.
- CC#: set which cc channel you want to send the data over. I recommend using cc channels that do not affect, for example, pitch bend or modulation. You can find a handy chart for which cc channels are free here.
Small note
The intention of this series of plug-ins was never to obtain conventional results directly and with little effort. It is more of an inspiration tool, a way to add uniqueness to your music. The output is also not a ready-made product that you can integrate into your Ableton menu. You still need to determine which sounds you want to trigger, how you want to generate notes, and so on. The plug-ins can be the starting blocks of a new creative process or help you come up with new ideas if you are stuck.